
Payment Gateway Chaos: How I Converted Multiple Providers into One
Picture this: You're building an app, everything's going smooth, and then your client drops the bomb — "Can we support PayU, Stripe, and maybe Razorpay too? You know, for flexibility."
Suddenly you're staring at three different APIs, each with their own quirks, data formats, and authentication methods. PayU wants a hash, Stripe wants sessions, and don't even get me started on their different ways of handling amounts (seriously, who decided some should use paise and others should use rupees?).
I recently found myself in this exact situation while working on a project, and instead of copy-pasting code like a barbarian, I decided to build something that wouldn't make me want to throw my laptop out the window every time I needed to add a new gateway.
The Problem: Payment Gateway Spaghetti
Most developers handle multiple payment gateways like this:
- Create separate functions for each gateway
- Copy-paste similar logic everywhere
- End up with a maintenance nightmare
- Cry a little when requirements change
There's got to be a better way, right? Right?
The Solution: Abstract the Chaos Away
Here's the pattern that saved my sanity (and probably my career):
Step 1: Create a Universal Payment Interface
First, I created a common type that could handle all payment gateways without losing my mind:
typescriptexport interface PurchaseTransactionData { session: any; itemId: string; amount: number; itemType: PurchaseType; productinfo: string; gateway: PaymentGateway; } export interface PaymentData { // Common fields for all payment gateways gateway: PaymentGateway; transactionId: string; amount?: string; productinfo?: string; firstname?: string; email?: string; phone?: string; surl?: string; furl?: string; // PayU specific fields txnid?: string; hash?: string; key?: string; // Stripe specific fields stripePayUrl?: string; publishableKey?: string; }
Is it perfect? No. Does it work? Absolutely. The key insight here is that you need one interface to rule them all — even if some fields are gateway-specific.
Step 2: The Abstract Base Class (The Real MVP)
typescriptimport { PaymentData, PurchaseTransactionData } from "@/types/payment"; import { prisma, PaymentStatus } from "@repo/db"; export abstract class PaymentGatewayBase { abstract createPaymentData( transaction: any, transactionData: PurchaseTransactionData ): Promise<PaymentData>; async createTransaction(transactionData: PurchaseTransactionData) { return await prisma.paymentTransaction.create({ data: { userId: transactionData.session.user.id, status: PaymentStatus.PENDING, amount: transactionData.amount, gateway: transactionData.gateway, itemId: transactionData.itemId, itemType: transactionData.itemType, }, }); } }
This abstract class does two things:
- Forces every gateway implementation to have a createPaymentData method
- Handles the common transaction creation logic so you don't repeat yourself
Step 3: Gateway Implementations (Where the Magic Happens)
Now here's where it gets fun. Each gateway just extends the base class and implements their specific logic:
PayU Implementation:
typescriptexport class PayUGateway extends PaymentGatewayBase { public async createPaymentData( transaction: any, transactionData: PurchaseTransactionData ): Promise<PaymentData> { const { merchantKey, merchantSalt } = await getPayUCredentials(); const data = { key: merchantKey, gateway: PaymentGateway.PAYU, transactionId: transaction.id, txnid: transaction.id, amount: (transaction.amount / 100).toString(), // PAYU wants floats productinfo: transactionData.productinfo, firstname: transactionData.session.user.name ?? "John Doe", email: transactionData.session.user.email!, phone: "1234567890", surl: `${process.env.NEXT_PUBLIC_SITE_URL}/api/payu-response?status=success`, furl: `${process.env.NEXT_PUBLIC_SITE_URL}/api/payu-response?status=failure`, hash: "", }; data.hash = generateHash(data, merchantSalt, merchantKey); return data; } }
Stripe Implementation:
typescriptexport class StripeGateway extends PaymentGatewayBase { public async createPaymentData( transaction: PaymentTransaction, transactionData: PurchaseTransactionData ): Promise<PaymentData> { const stripeCredentials = await getStripeCredentials(); const stripe = new Stripe(stripeCredentials.secretKey); const session = await stripe.checkout.sessions.create({ mode: "payment", customer_email: transactionData.session.user.email, client_reference_id: transaction.id, line_items: [ { price_data: { currency: "inr", product_data: { name: transactionData.productinfo, }, unit_amount: transactionData.amount, // Stripe wants paise }, quantity: 1, }, ], billing_address_collection: "required", success_url: `${process.env.NEXT_PUBLIC_SITE_URL}/shop/?transactionId=${transaction.id}`, cancel_url: `${process.env.NEXT_PUBLIC_SITE_URL}/api/stripe-response?transactionId=${transaction.id}`, }); return { gateway: PaymentGateway.STRIPE, transactionId: transaction.id, stripePayUrl: session.url || "", publishableKey: process.env.NEXT_PUBLIC_STRIPE_PUBLISHABLE_KEY!, }; } }
Step 4: The Factory Pattern (Because We're Not Animals)
But wait, there's more! Manually instantiating gateway classes everywhere is still messy. Enter the Factory pattern:
typescriptimport { PaymentGateway } from "@repo/db"; import "server-only"; import { PaymentGatewayBase } from "./payment-base"; import { PayUGateway } from "./payu"; import { StripeGateway } from "./stripe"; export class PaymentGatewayFactory { static create(gateway: PaymentGateway): PaymentGatewayBase { switch (gateway) { case PaymentGateway.PAYU: return new PayUGateway(); case PaymentGateway.STRIPE: return new StripeGateway(); default: throw new Error(`Unsupported payment gateway: ${gateway}`); } } }
Now your server-side code becomes beautifully simple:
typescriptconst gateway = PaymentGatewayFactory.create(selectedGateway); const transaction = await gateway.createTransaction(transactionData); const paymentData = await gateway.createPaymentData(transaction, transactionData);
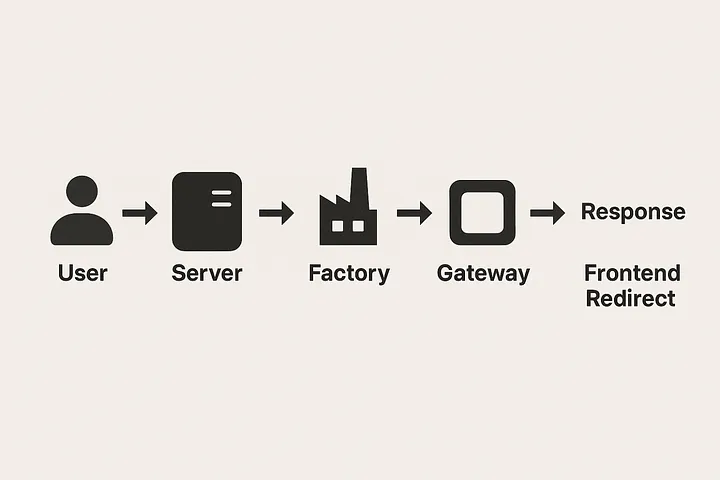
Step 5: Frontend Magic (The Cherry on Top)
The frontend doesn't need to know about your fancy abstractions. It just needs to handle the response and redirect users accordingly:
typescriptif (paymentResult.success) { switch (paymentResult.paymentData?.gateway) { case "PAYU": redirectToPaymentPage(paymentResult.paymentData); break; case "STRIPE": window.location.href = paymentResult.paymentData?.stripePayUrl || window.location.href; break; default: throw new Error("Unsupported payment gateway"); } }
Each gateway gets its own redirect logic, but the main flow stays clean and predictable.
Step 6: Adding New Gateways (The Real Test)
Now adding a new payment gateway is genuinely simple:
- Create a new class that extends PaymentGatewayBase
- Implement the createPaymentData method
- Add the case to your Factory class
- Add the frontend redirect logic
- That's it. You're done.
Want to add Razorpay? Just create RazorpayGateway extends PaymentGatewayBase, add it to the factory, and handle the frontend redirect. No existing code needs to change.
The Beauty of This Approach
This pattern gives you:
- Consistency: Every gateway follows the same contract
- Maintainability: Common logic lives in one place
- Scalability: Adding new gateways doesn't break existing code
- Testability: You can mock the abstract class for unit tests
- Sanity: You won't hate your life when requirements change
Conclusion
Payment gateway integration doesn't have to be a nightmare. With a little bit of abstraction and a lot of TypeScript magic, you can build something that's actually maintainable.
The next time someone asks you to "just add one more payment gateway," you can smile knowingly instead of updating your resume.
Now if you'll excuse me, I need to go figure out why Razorpay's webhook decided to stop working again. Some things never change.