From Web to Mobile: Building PWAs with Next.js & Bubblewrap
The Realization That Hit Me Like a Truck
So there I was, scrolling through my phone, and I noticed something weird. Almost every "app" I was using daily wasn't really an app—it was just a website pretending to be one. Twitter, Instagram, even some banking apps. They loaded fast, worked offline, and felt native.
That's when it clicked: Progressive Web Apps (PWAs).
I'd been building React/Next.js apps for years, but I was missing this whole world where you could take your web app and make it feel like a proper mobile app. No app store approval hell. No learning Swift or Kotlin. Just good old web tech doing mobile things.
Wait, What Actually IS a PWA?
Okay, so before I dive into the how-to, let me break down what PWAs actually are—because I definitely overthought this at first.
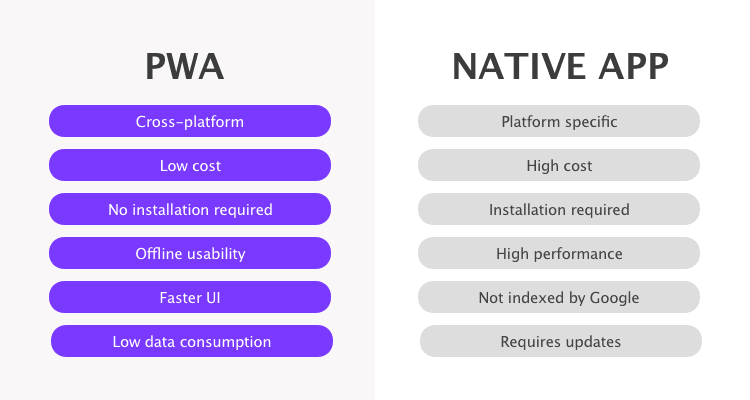
A PWA is basically a website that acts like a mobile app. It can:
- Install on your phone like a real app
- Work offline (kind of)
- Send push notifications
- Access device features like camera, GPS, etc.
- Feel smooth and native-ish
The magic happens through something called a Service Worker (handles offline stuff) and a Web App Manifest (tells the browser how to behave like an app).
And the best part? If you're already building with Next.js, you're like 70% there already.
Why I Went Down This Rabbit Hole
I had this side project that worked great on desktop, but mobile users kept asking "where's the app?" Every time someone visited on mobile, they'd try to find it in the app store.
Building separate iOS and Android apps felt like overkill for what was essentially a web app. Enter PWAs and Bubblewrap—Google's tool that takes your PWA and wraps it into a proper Android app you can actually publish to the Play Store.
Step 1: Icons (Because First Impressions Matter)
You can't have a proper app without proper icons. I used to spend hours in Figma creating different icon sizes, but there's a much easier way.
Head over to https://pwa-icon-generator.vercel.app/ and upload your base icon. This tool generates all the sizes you need—from tiny 16x16 favicons to massive 512x512 app icons.
Download the zip, extract it to your
publicStep 2: The Manifest (Next.js Makes This Easy)
Here's where Next.js really shines. Instead of manually creating a
manifest.jsonmanifest.tsapptypescriptimport type { MetadataRoute } from "next"; export default function manifest(): MetadataRoute.Manifest { return { name: "My Awesome App", short_name: "AwesomeApp", description: "A really cool web application", start_url: "/", display: "standalone", background_color: "#ffffff", theme_color: "#2563eb", orientation: "portrait", lang: "en-US", scope: "/", id: "/", icons: [ { src: "/icon512_maskable.png", sizes: "512x512", type: "image/png", }, { src: "/icon192.png", sizes: "192x192", type: "image/png", }, ], }; }
The
display: "standalone"Step 3: Enter Bubblewrap (The Game Changer)
This is where the magic happens. Bubblewrap is a CLI tool that takes your PWA and packages it into a proper Android app.
First, install it:
bashnpm install -g @bubblewrap/cli
IMPORTANT: Do NOT run this in your Next.js project root. Seriously. I learned this the hard way when I accidentally pushed Android build files to production and my app crashed. Create a separate folder for this.
bashmkdir my-app-android cd my-app-android bubblewrap init --manifest https://yourapp.com/manifest.webmanifest
Bubblewrap will ask you a bunch of questions—app name, package name, keystore password, etc. Just answer honestly, and it'll set up the entire Android project structure for you.
[Image placeholder: Terminal showing bubblewrap init process]
Step 4: Building Your App
Once the setup is done, building is surprisingly simple:
bashbubblewrap build
This generates:
- An APK file (for direct installation)
- An AAB file (for Play Store upload)
- All the necessary Android project files
The build process takes a few minutes, but when it's done, you have a real Android app that you can install on any device.
Step 5: The URL Bar Problem (And How to Fix It)
Here's something that tripped me up initially. Even after all this setup, your app might still show that ugly browser address bar. That's because Android needs to verify that your website actually "owns" this app.
You fix this by creating a file at
public/.well-known/assetlinks.jsonjson[ { "relation": [ "delegate_permission/common.handle_all_urls" ], "target": { "namespace": "android_app", "package_name": "com.myapp.example.twa", "sha256_cert_fingerprints": [ "A1:B2:C3:D4:E5:F6:G7:H8:I9:J0:K1:L2:M3:N4:O5:P6:Q7:R8:S9:T0:U1:V2:W3:X4:Y5:Z6" ] } }, { "relation": [ "check_validation" ], "target": { "namespace": "android_app", "package_name": "com.myapp.example.twa" } } ]
To get that SHA256 fingerprint, run this command in your Android project directory:
bashkeytool -list -v -keystore android.keystore
Enter the password you set during bubblewrap init, and you'll see output like this:
codeCertificate fingerprints: SHA1: 12:34:56:78:90:AB:CD:EF:12:34:56:78:90:AB:CD:EF:12:34:56:78 SHA256: A1:B2:C3:D4:E5:F6:G7:H8:I9:J0:K1:L2:M3:N4:O5:P6:Q7:R8:S9:T0:U1:V2:W3:X4:Y5:Z6
Copy that SHA256 value into your assetlinks.json file.
The Play Store Gotcha
If you're planning to publish to the Google Play Store, there's one more step. Google re-signs your app with their own key, so you'll need to add their SHA256 fingerprint to your assetlinks.json file as well.
You can find this in the Google Play Console under Setup → App Signing. Just add it as a second entry in the fingerprints array. A detailed guide
What Actually Changed for Me
After going through this whole process, here's what I gained:
- Real app experience: Users can install it from the Play Store, it appears in their app drawer, and it feels native.
- Better engagement: People are way more likely to use something that's "installed" vs bookmarked.
- Offline capability: With service workers, core functionality works even without internet.
- One codebase: I'm maintaining one Next.js app instead of separate web and mobile codebases.
The Reality Check
Let's be honest—PWAs aren't perfect. iOS support is still weird (thanks, Apple). Some device features are limited. And you'll still need to understand Android development concepts if you want to customize things.
But for most web apps that want mobile presence, this approach is so much faster than building separate native apps.
Conclusion
So yeah—PWAs aren't just a buzzword. If you're already building with Next.js and want to tap into the mobile app ecosystem without learning entirely new technologies, this is probably your best bet.
The whole process took me maybe 3-4 hours from start to finish (including the learning curve and that one time I accidentally nuked my build folder).
I'm still experimenting with advanced PWA features like background sync and push notifications, but so far, this has been one of the smoothest paths from web to mobile I've ever taken.
If you're sitting on a Next.js app wondering how to make it "feel more appy"—maybe it's time to go PWA.